Attic Insulation – Do You Have Enough?

July 30, 2011

rockwool1Proper attic insulation can make a drastic impact on your utility bills. Any home over 5 years old should have the attic insulation evaluated as settling insulation and higher summer temperatures  can degrade its ability to protect your home from the summer heat.

7 reasons to be concerned about the condition of your attic insulation.

  1. High utility bills.
  2. Its been more than 5 years since the house was built.
  3. You have lived in the house for more than 10 years and never evaluated it.
  4. Some thermal insulation materials settle more than others.
  5. Increasing summer temperatures require more insulation.
  6. Recent contractor activity in the attic  (i.e. telephone, CATV, Security, HVAC). These workers can matt down the insulation while performing their job.
  7. Rodent infiltration. These buggers will easily pack down the insulation to get to various points of interest.

Acceptable attic insulation 10 years ago is not the same as it is today. In fact, in just 3 years, my region has been increased from an acceptable value of R31 to R38.

The Inspection:

  • Determine how much insulation is required. Use this Insulation Chart to determine how much is enough.
  • Enter the attic with great care. Attic entrances may be through a door or attic stair case or possibly a hatch in the closet. WARNING: You must keep your feet/body on the wood joists (beams) as stepping on the sheet rock will cause damage, and possibly cause you to fall through the ceiling.
  • With a flashlight and yard stick: Randomly check the depth of the material. Ensure the measuring device (yard stick) touches the sheet rock and measure to top edge of the insulation material. Try not to crush the insulation while performing the inspection.
  • Determine the type of insulation.  Different material have different R values.

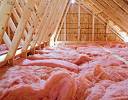
rockwool3If you can see the ceiling joist as in this picture, you  probably do not have enough insulation.  Typical ceiling joists can range from 2 X4’s, 2X6’s to 2X10’s.  For instances, if you have 2X6 beams with loose fill rock wool, you would have a R value of 16.5 (3.0X5.5″=16.5). Newer houses typically have larger beams. Determine the material type as this will help in figuring out how much insulation to add. Use the chart below to calculate the R value of the existing insulation. TIP: If you find you have enough insulation in areas that have not been disturbed, but you find areas matted down due to activity or construction work. Use a soft plastic rake to fluff it back up.

Insulation Table

Common Types of Insulation in Residential Attics

  • batt insulationFiberglass: Comes in batts, blankets, and loose fill, either pink, white or yellow in color. Fibrous in nature and can leave you with microscopic splinters. TIP: Before working with fiberglass insulation, spread a heavy coat of baby powder over any exposed skin, this will fill your pores briefly while working with the material.
  • rockwool2Rock Wool (or Mineral Wool):Loose fill used aggressively prior to 1970. Usually brown or dark gray in color.
  • Cellulose:Loose fill made of recycled paper. Blue or gray in color. With close inspection you will find small pieces 100_0550of newspapers. The product is treated with a fire-retardant solution for safety.
  • Combination:This is not a type, but you may find a combination of two or all three types. Previous owners may have added insulation over the life of the house. This is not a problem, but you should determine how many inches of each type to calculate the value of the existing insulation.

By now, you should know, how much insulation you have vs. what you need. Assuming you need to add insulation, HomeownerBOB highly recommends hiring a professional for this task even though the home centers will provide you tools to perform the work. Once you determine what type of new insulation you prefer, you can easily bid shop the work over the phone.  The professional will need to know 1) square footage of the house, 2) type of insulation material you would like, 3) how many inches to apply.

So how do you determine what type of insulation to use? Read my article on “The Choices“.


Radiant Barrier – Things to Consider

April 24, 2010

Radiant Barrier has a long successful history as a way to reduce heat loads, but didn’t really get the deserved credit until NASA  acknowledged its use in the Space Program.  As a construction product; it is basically heavy-duty aluminum foil with at least one shiny side. For a greater understanding of the principles of this product, see  How it works? 

During the summer, an attic radiant barrier, combined with existing R-19 attic insulation, may reduce heat gain through the ceiling from 16%-42%. For single-story houses, typically about 15%-25% of the summer cooling load is due to ceiling heat gain. During the summer, the interior ceiling becomes a radiant heater adding heat to the interior spaces. The heat gain reduction from a radiant barrier installation will usually result in a total cooling load savings of 2%-10%-possibly as high as 15% in attics insulated to R-11 or less. Higher savings occur when retrofitting less efficient buildings. Buildings with little to no attic insulation and a high volume of attic ventilation typically provide the most dramatic energy savings from a radiant barrier. The hotter and sunnier the climate is, the more beneficial the radiant barrier installation becomes.

Types of Radiant Barriers

  • Foil Faced Decking Material: With the trade name of TechShield, this radiant barrier product is applied to the back of roof decking during manufacturing and can be applied when the house is built or during a re-roof. Efficiencies of this product is in the neighborhood of 95-97%
  • Rolls or Sheets: The sheets can be applied in a couple of methods; 1) Tacked up on the rafters or 2)rolled out on the attic floor. The labor makes these choices fairly expensive, but you can reduce the installed cost by making it a  DIY project.
  • Spray on Solution:  This is a fairly new option, and came about because of the installed cost  of rolls or sheets. However, spray on radiant barrier is only about 65% as efficient as the aluminum foil types and lacks the low emissivity factor found in the other products. So it may have a lower installed cost, but your benefits will not compare to previously mentioned type.

Things to consider before purchasing or installing a Radiant Barrier

  1. Climate: If living without air conditioning is not an option for you,  you may live in a temperature zone worthy of installing radiant barrier. Studies have shown, this product works better in very hot climates. If your attic regularly exceeds 130 to 140 degrees F, radiant barrier can reduce the attic heat load allowing your HVAC to work more efficiently , in-turn reducing your electricity consumption. If you live in climates similar to Arizona, Florida, or Texas,  you are probably a candidate for radiant barrier.
  2. New Construction or Re-roofing plans: If you are considering either of these projects, foil faced roof decking can be purchased for a couple of dollars per sheet. This is the most inexpensive method to obtain radiant barrier. 
  3. Attic Insulation: Make sure you have enough attic insulation, radiant barrier is not an insulation replacement product but just part of the equation. Having the proper amount of attic insulation combined with a radiant barrier product will provide the maximum benefit.  Also see Insulation: Do you have enough? and Insulation Choices.
  4. Radiant barrier as a DIY project: Choose a product that has high tensile strength or is embedded with tightly woven fiber mesh; either of these features will reduce the opportunity for the product tear during the installation process. There is also a bubble pack version that appears to be as strong too. The bubble pack version is a great product for re-insulating HVAC ducts. Any radiant barrier product should be UL listed and/or have a NFPA “Class A”  flammability rating.
  5. Location to place the radiant barrier: The following table shows a comparison of the effectiveness of the product applied in 4 different locations. Even though the attic floor application appears to be the most effective, this location may 1) cause moisture to collect under the barrier, 2) collect excessive dust; known to reduce its effectiveness and 3) add to the complexity to performing future work in the attic.  HomeownerBOB recommends avoiding using this product on the attic floor. 
Radiant Barrier Location Whole House Tests Test Cell Tests
Mineral InsulationLab Oak Ridge Lab Solar Energy Cntr Tenn. Valley Auth.
Roof: attached to roof deck —- —- 36 – 42% 16%
Roof: stapled between rafters —- —- 38 – 43% —-
Roof: stapled under rafters 24% 25 – 30% —- 23 – 30%
Attic Floor*** 35% 32 – 35% 38 – 44% 40 -42%

If re-roofing is not in your future, installing the barrier on or under the rafters to gain the most long-term effectiveness is probably your best choice. Most of these products qualify as an energy tax credit so take advantage of the opportunity and get it installed before it gets too hot.

Reference Studys of Effectiveness of Radiant Barriers

  1. TAMU Study
  2. Radiant Barrier Fact Sheet; DOE Oak Ridge National  Laboratory 

Caulking and Sealing

January 11, 2010

 The colder months make it easy to find problems associated with door and window seals. I spent the day caulking window casings and sills today (inside the house). With the temperature hovering around 25F, it was easy to find the bad spots. Lucky for me, my house is in pretty good shape. I haven’t done any window maintenance in about 4 years.

It’s  not uncommon to see shrinkage (not the George Costanza type) in building materials such as caulk, grout, wood trim and spackling (all water based products).  This is usually the time of the year you will see more cracks around your shower, bathtub, kitchen as well as windows and doors. This is a great time to do interior caulking  in all of these places. If you own a new house that is less than 5 years old, you will probably notice significant amounts of cracks related to this type of contraction. It’s is important to understand; caulking is not a one time event. The material will continue to move and you may have to continue to re-caulk over the years.

PURPOSE OF CAULK: Caulk or sealant is used to bridge the gap between two material. Typically corners, seams and edges, especially where two dis-similar material meet. Caulk is used to create a barrier for air, water, grunge and 4 legged creatures from entering the house as well as keeping  untreated materials from being exposed to those elements. Universally, caulk is used as an exterior and interior sealant to protect both you and your home. 

CAULKING AND SEALS

Window Caulking: Assuming you have functional windows, the caulking should be limited to the where the two opposing surfaces contact each other. (i.e. window frame and wall). If there are gaps and cracks, clean them and fill with a thin coat of water based acrylic latex caulk. Painting after you finish may be required, but that is your call. My trim is off white and it blends well enough to be left as is. If you find no cracks or gaps leave it alone, no need to add layers of caulk just because. I took these before and after pictures of one of my windows. Hopefully you can see this is a very thin seasonal dryout crack that I filled with caulk.

Tub and Shower Caulking: Similar to windows. Look where the tile or wall surface touches the tub it self. This is where most of the problems are. Keeping a good water tight seal at this location is critical  in keeping water from getting behind the tub; and same goes with the shower. These surfaces will require more regular inspection and recaulkng to keep them up to snuff. If you live in an older home you may find lots of caulk gunked up here. If you continue to see mold in this location even after caulking, it would be a good idea to spend the time and remove all the old caulk, let it dry and replace all the caulk. This is a very laborious job but once its done right you will not have to caulk near as often.  Inspect for recaulking every 6 months.

Caulking “Part Art Part Function“: Caulking appears to be an easy task, however it’s also very easy to make a mess of it. One of the reasons I use a latex based product as often as possible is because its very easy to start over if you mess up.  TIP: After applying the bead of caulk, moisten your finger and smooth the caulk into the corner, if you have too much caulk it will spread outside your finger, wipe it off and keep going. Use a wet rag to carefully clean it up. If needed, use your finger again. Continue to work it until you like the way it looks.  Even though most instructions will not include this tip, I learned this from a wise old painter and  it really makes a difference.

It’s estimated that up to 11 percent of the air leaks in a building are around the doors.

Door and Window Trim: This is related to the trim or molding around the windows and doors. Typically this is done prior to painting. Look for small dryout cracks at the joints and edges.  Try to force the caulk in the crack it self and wipe clean the surface. Look at these before and after pictures of this interior door trim.

Door Seals: All exterior doors should have some form of seal. It could be rubber, plastic, foam or even metal strips (usually copper).  This seal creates a barrier to keep the outside temperatures outside, and the inside temperatures inside. Inspecting this on a windy day can reveal leaks. Look at the seal(s), ensure they are in tack, and form a complete seal around the door frame. Look at the door threshold in the same way. In some cases there may be a wiper (thin rubber strip on the bottom of the door) to make contact with the threshold when the door closes. If you find problems, you may be able to fix them but most likely the complete seal may have to be replaced.  The local hardware store usually has many styles to choose from. When replacing a door seal, it is important to find the right one. Using one that is too think will make the door difficult to open and close.  Look at this site on weather-stripping for a detailed description of the various styles.

Attic Entrance: Either a hatch or attic stairs. If it’s a hatch seal it the same way as a crawl space hatch. If you have a hinged stairway you can seal the door much like the crawl space, however adding insulation over the hatch will provide additional value. Here are some examples of tents and hoods that will work. If you have room, you can make one out of insulated fiber board.

Crawl Space Entrance: If you have a basement or the house is built on a slab, this will not apply to you. Many houses with a crawl space will have a hatch in the floor. Use a small strip of  foam based weather-stripping attached to the contact surface between the hatch and floor, this will help keep the winter drafts down. TIP: It doesn’t hurt to have a patch of fiberglass insulation to fill the void in the hatch hole, it would be removed  when you need access.

For more detailed methods of caulking and sealing see the attached DOE article covers the subject of caulking, sealing weather-stripping.  Weatherizing your Home.


Re Insulating HVAC Ducts

December 1, 2009

The US EPA reports leaking ducts reduce overall HVAC efficiency by 20% accounting for a loss of over $140 per year due to these leaks.

 As mentioned in earlier articles, HVAC ductwork has not received the attention it deserves. Take a look at  my HVAC Duct article to evaluate and inspect your existing duct work. If you have determined that it is in need of attention you have three choices, 1) do nothing, 2) have them replaced or 3) re-insulate them.

  Duct Replacement: Be prepared, HVAC contractors typically want to sell new systems.  Here is the SW part of the US, their big season is the summer, having this done during the cooler months may be a better choice. Duct replacement is not as profitable as system replacements, but keeping their technicians busy can be better than not working them at all.

Considerations when discussing this issue with a HVAC professional:

  1. Flex ducting is a widely used proven product but does not have the long-term performance rating found with a typical sheet metal product. But is widely used in the residential market and most professionals like to use it because it is easy to install and not as labor intensive as rigid duct work. This product  can easily be mis-installed by creating kinks and  sharp bends that can reduce the product performance. Read this flexible duct inspection method before you meet with the contractor to better understand the product and how it is applied.
  2. After an evaluation, most HVAC specialists will want to replace the ducting in lieu of  repairing or re-insulating. Why? It’s quicker, cheaper and it becomes a known value. This is not a bad thing, these folks are trying to make a living and attacking the problem by replacing everything may be an economical solution for both of you.
  3. If you allow a professional to replace the ducts, make sure to ask some of these questions. Will all the joints and edges be sealed with (paint on) mastic? What is the R value of the new duct? What is the life expectancy of the duct product? What is the product warranty? What preventative measures are followed to avoid kinking (of the ducts). Will the system be tested for leaks after completion?
  4. If the professional didnt mention it,  also consider having all the output and return registers (this is the box in the wall/ceiling where the vent cover is attached) replaced or re-insulated. Most new registers are sealed and insulated to insure a tight fit. Also, ask them to use spray foam insulation between the register protrusion and the sheet rock, this will further seal the interior  from the attic space. Most HVAC professionals do not address register penetration into the interior space.
  5. If you have any rooms that never seem to adequately heat or cool, make sure and mention this to the professional too as he may have to resize or reroute the new duct work to better balance the system.

Duct Re-insulation (for rigid ductwork): This is a great DIY project if you consider yourself cheap labor and you dont mind working in the attic. Consider this a mult-weekend project. Before you start, ask yourself these questions. 

  1. Does your system work reasonably well? If you have any rooms or areas in the house that never properly heat or cool, consider adding an additional output duct as this would be the time to address it. Consider using a professional to perform this work as you may need to rebuild some of the system to retain the system balance.
  2. Is your attic adequately insulated? If not, plan to do it, but after all you other attic work is complete.

 The process if fairly straight forward and here is an outline of the necessary work.

  1. Strip the existing insulation material
  2. Ensure all joints are secure and snapped and screwed together
  3. Use duct mastic to seal ALL seams and joints
  4. Use HVAC tape to complete any seals not treatable with mastic
  5. Use expanding foam insulation to fill any cracks between the duct registers and the sheet rock
  6. Use duct wrap to re-cover all the exposed duct, seal with duct tape and mastic

Material Required for the Job

  1. Duct wrap rated at an R value based on your region (see table below)
  2. 1/4,1/2, and 3/4 self tapping sheet metal screws
  3. HVAC Duct Mastic
  4.  Take adequate precautions while working in the attic. Avoid stepping directly on the sheet rock ceiling and wear protective clothing and dust masks.
  5. If a professional indicates the duct are under/oversized, you may ask them to provide  the Man L or Man J duct analysis supporting their position. (This is an engineering schedule that is used to properly size ducting.)


Attic Insulation – The Choices

September 20, 2009

batt insulationAccording to the US Department of Energy, as much as 45% of a home’s energy loss is through the attic. Furthermore, 80% of homes built before 1980 suffer from inadequate insulation

A friend of mine was looking to buy a house recently, he asked me to come by and check it out. It was apparent the owners of the house were fairly interested in reducing their electric bill. Most all of the light fixtures were using CFL’s, they were using a set back thermostat and they had recently replaced an exterior door with one that was Energy Star rated. But what really shocked me was my trip to the attic.  Three  things, 1) they had sprayed radiant barrier paint on the roof decking but 2)  there was less  than 3 inches of insulation in the attic and 3) the air conditioning ducts lacked adequate insulation requiring the HVAC unit to work extra hard to provide the conditioned air throughout the house. I’m not knocking the radiant barrier (I’m a believer), but even most of the radiant barrier folks will tell you to increase you attic insulation first. There are good reasons why HVAC  installers sometimes throw in insulation or RB as part of their package… it works and it also reduces the strain on the HVAC. Blown in insulation is cheap and it can be added in a mater of hours.

Attic Insulation is best applied as blown in loose fill when you need to add  more to an existing home. The product will reach into every nook and cranny, is easy to apply (with the proper equipment), and has instant results. The best way to determine the amount of insulation needed is to refer to this US. DOE  site as it will provide the recommended R-Value down to the zip code.

Making the choice

What is the difference between the attic insulation products and why is one better than the other? If you spend any time looking at the comparisons of the products you will find advantages and disadvantages in all the of them. Its very easy to get caught up in the data, in fact some make a point in overpowering the consumer with too much data. The following chart reflects the most popular products and comparable characteristics that most consumers can understand and recognize value in them. This comparison is for blown-in type insulation only, and these products are typically the most popular. 

 Insulation Table2

 Concerns associated with the compared products:

Rockwool: Rockwool insulation has been classified by the US Gov. as a class 2B carcinogen with   “possible” evidence but lacked conclusive results to be considered a “probable” contributor as a cancer causing agent in lab rats. Additionally, chards of the material will cause skin irritation much like fiberglass. It was very popular prior to 1970 and with some limited concern is still used as an insulation product.

Fiberglass: Fiberglass insulation has been shown to reduce its effectiveness during both high and low temperature ranges (due to convection heat loss), potentially reducing its effectiveness by up to 50%. Even though fiberglass chards can easily irritate the skin, once installed, little risk to the homeowner has been proven. However, the US Gov. has recognized fiberglass as a carcinogen, the levels have been shown to be too low to impact the homeowner.

Cellulose: Cellulose has become recently popular due to being composed of  recycled paper products. Cellulose is heavy compared to the other two and the added weight in the attic may cause standard 1/2″ sheet rock to sag or droop when applied to ceilings with joists spaced at 24″ centers. Additionally, since Cellulose will retain water, moistened by a roof leak may cause the  sheetrock to prematurely fail. Even though the product is treated with chemical flame retardant (generally with a lifetime guarantee), additional care should be exercised by providing adequate space around recessed light fixtures, chimney flues, water heater and HVAC vents.

The blown-in insulation business is fairly competitive and you may find (as I did) that hiring a professional is about as cheap as doing it your self. HomeownerBOB recommends the professional route. The difference in the choices are fairly close, cost may be the most important factor, on the other hand it might be the environmental impact. Either way, make the decision, you will be happy with the results.