Finding a Lost Sprinkler Head

July 18, 2009

Lawn Sprinkler4Finding a lost sprinkler head can be a challenge, simple in concept but difficult if you don’t have a plan.  Sprinkler heads can fail to rise to the occasion when under pressure. The longer they fail to operate the harder they may be to find. 

Perform these items first:

  1. If available, look at the drawing used during the installation system, it may work as a road map in identify the general location.
  2. Look for an obvious brown/dry spot. Run the sprinkler, it may pop up but be clogged. If so, disassemble it, clean it, reassemble it, install it and you are done. If not, go to #3.
  3. If the entire zone appears to be weak, you may find water pooling. This could actually be a broken head or pipe as in this condition you are consuming way more water than the design.
  4. With the sprinklers running, look for mushy ground  and water pooling. The head may be working, but it is too covered up to rise above the grass. Use a shovel to work the dirt (carefully). It may pop up once the dirt around it has been loosened up.

Missing SprinklerOkay, that was the easy stuff, now it gets hard. Go to the Orange Box store and purchase some sprinkler flags. Place a flag at each known head. Measure the distances between the heads as shown in the drawing.  You should find an area that does not measure (in relative terms) like the other ones. Start poking around with a shovel (carefully) in an attempt to expose the head 

Still no luck? Using the same method described in Finding Leaks in Sprinkler Zones and Common Leaks. You will need to turn off all the heads in that zone. Let the water run, hopefully,  it will show up since you are concentrating all the pressure to the missing head. Check your meter and look for moderate movement in the meter. If you have no movement in the meter the sprinkler head could be capped or not there at all.

Still didn’t find it?  You may not have a head there at all and the design just did not cover it well. So you may consider adding a head if the zone can accommodate the additional water use.

You may also take a look at one of my other articles for help in the Lawn Sprinkler catagory.


Lawn Sprinkler Nozzles, Can Changing Them Make a Difference?

July 12, 2009

sprinklers-01   

Heavy misting of the sprinkler heads can result in as much as a 25% loss in water.    

New sprinkler heads and nozzles coming on the market are claiming sizable water savings, but how much water can you really save (if any)?  Stream sprayers are normally found only in orbital or rotary heads and are typically found in larger landscaped areas and can be spaced 20′ to 30′ apart. With an open landscape, these heads can water more ground with less water. Up until now, there have been few options for smaller residential properties other than traditional pop-up heads using spray type nozzles. Spray nozzles are designed for spacing limitation from 8′ to 15′ and as with any type water sprayer, there is a correlation between distance and trajectory or arc necessary to obtain the distance. The greater the distance, the greater the height of the arc to obtain the distance. Greater distance = greater misting.    

But trajectory alone is not the only culprit to misting. High winds, high pressure, evaporation and excessive overspray all contribute to the water loss factor associated with misting. This misting can account for a loss of 10-25%. It’s this misting factor (more characteristic of spray nozzles over stream nozzles) that contributes to a lower efficiency found with the spray nozzle.  And its the low misting factor found with the stream sprayer that makes for an attractive alternative.     

In an attempt to make automatic sprinkler systems more efficient, some manufacturers have created a stream type nozzle designed as a direct replacements for the standard spray nozzle (aka pop-up sprayer). If you have read my earlier posts on lawn sprinklers you know that pop-up type spray heads can lose 10% or more of their water spray to the wind and evaporation.   Before we look at the differences between spray nozzles and stream nozzles, lets consider the ways to reduce sprinkler misting. Some of these items can be readily addressed, some are design considerations.    

Standard Spray Nozzles: Standard spray nozzles atomize the water to equally spray or spread the water out in an even flow throughout their spray pattern. They are great choice for small residential properties as they provide good water distribution in a reasonable amount of time. Additionally they have many different nozzles to fit the various application requirements.   

012106_lwn_sprinkler02_dt   

  1. To much pressure: Optimally pop-up sprayers work best at 30 psi. High pressure can cause excessive misting.  TIP: To test the zone water pressure, you have to remove a head, replace it with a riser and thread on a water pressure gauge, then run the zone and check the pressure while the zone is spraying water.
  2. Don’t water during high winds:   This can be managed manually or you can add a wind anemometer to your sprinkler controller that will shut down the system at certain wind speeds. Even though we typically water in the night-time hours (to avoid excessive evaporation), windy conditions are as common during the night-time as during the day.
  3. Keep water spray output close to the ground: This can be achieved by designing a system where the heads are closer (such as 10′ apart compared to 15′ apart)  Spray nozzles with shorter patterns use lower trajectories, will atomize the water less and have less distance to fall to the ground.  This item has to be addressed during the initial design as shortening patterns in an existing system could be considered a “do over”. I designed and installed my current system prior to stream sprayers, I took this approach by using 10′ radii heads. The water stays very close to the ground when the system is running. Granted, it caused me to use a lot more heads and zones. If I were to tackle it today, the stream sprayers would not only impact my water  usage, but cut back on material and zones installed. 
  4. Deliver the water in streams not in a spray or mist: The more you atomize the water, the lighter it becomes, allowing the wind to cause the water to drift away and evaporate before it has time to absorb into the ground or plant material.
  5. Deliver water directly to the roots through drip irrigation.  Flower beds can be easily converted (assuming your sprinkler system has specific zones for flower beds). For grass and turf this is a bit more involved but plausible.  In my current system I created specific zones for the parkway and driveway. Using direct bury drip lines, I am able to keep the turf green with virtually no run off. This is another condition that would need to be addressed in the original design.
  6. Refer to the  Alliance of Water Efficiency, for additional water saving tips. 

Water Use and Abuse   

There is a fine line between efficient water delivery and adequate water coverage. Many irrigators will “over cover” an installation to ensure all the grounds receive adequate water. The Irrigator wants to over-saturate the turf to avoid brown spots or low coverage areas, as making a re-trip to install additional heads can be costly. Creating a system that uses excessive water will cause them less problems in the long run. But in doing so, there may be a high degree of waste associated with the design. Don’t get me wrong, the lawn sprinkler business is very competitive and most people won’t spend the money to get a system with high-efficiency. Since water is still cheap and fairly plentiful this methodology will be with us for a while. However, the purpose of this article is to attempt to make your existing system more efficient and if you have a decent design, you can make some reasonable changes that will not terribly affect the performance of the system.   

Lawn%20edge%20pop%20up%201Stream Sprayers: Stream spray nozzles provides multiple streams from the nozzle in the defined pattern (90, 180, 360 degree pattern). To provide adequate coverage, the streams spray in a rotation throughout the pattern.  The beauty of the stream type nozzle over the spray nozzle is it will project water similar distances without high levels of misting. However, based on their delivery you may actually have to run the systems longer to get similar watering results, but since they are more efficient, it will not negatively impact the system performance.  With the move toward greater efficiency, the stream principle has been introduced to traditional pop-up sprayer. Some manufacturers provide them as replacement nozzles, where others require you to change out the complete head. TIP: Look at one of your spray heads to determine the brand, go online to see if the manufacturer makes a replacement nozzle, don’t be surprised if your local orange box store does not carry them. I have used Sprinkler Warehouse for many of my sprinkler parts and speciality items.   

The Test Case: I created a model zone with 4 heads, 2-180 degree heads and 2-360 degree heads.  I used the Toro 570 model body as it can be equipped with either the spray nozzle  or retrofitted with the stream nozzle. Optimally, the comparison is based on a 30 psi rating at the head.    

In converting the system from spray to stream we need to match the pattern as close as possible. Since spray heads are a mature product, many patterns and styles are available, but with the stream nozzles, the available styles are still limited. With the Toro brand, the new stream nozzles are not a direct comparison in spray distances and the stream nozzles may have to be tuned to reduce the pattern to avoid excessive over-spray onto the sidewalk. But they were pretty close.   

Stream Spray Matrix

Spray Nozzles De-rated by 10%


Sprinkler Table2

Spray Nozzles De-rated by 25%%


 From a cost comparison, it is beneficial to be able to re-use your existing spray heads if at all possible,  as having to buy new heads as well as the nozzles will add up quickly. When you look at the water saved vs. the cost of the change, it did not prove out (for me) since water is still very cheap. However many municipalities tack on additional charges based on water usage, so it could make a difference for you. If you are interested in seeing how much difference it makes, take the water saved (listed in the table and calculate it against your dollar per gallon charges found on your water bill.   

Based on the results of the chart, here is my observations using the 10% de-ration chart.   

  1. It requires 86.72 minutes using the stream spray nozzles to provide the same precipitation value as the spray nozzle provides in 60 minutes.
  2. Even though it requires 26.72 minutes more, the stream sprayers use 393 less gallons
  3. Factoring in a 10% misting factor, the stream sprayers use 5.77% less water or 471.63 gallons of water per month.

At a 25% deration the numbers are a bit more dramatic as you could save over 1700 gallons of water per month.   

Conclusion:    

  • Consider using the stream sprayers in a new design as you can use less heads, less zones, less pipe, less fittings as well as less water. 
  • Convert existing sprinkler zones to stream sprays where high wind is normal or misting is excessive.

Recommendation: If you choose to replace your existing nozzles/heads, change one zone at a time. Let it run through part of the season, compare the results by looking at your turf . For proper watering don’t mix spray nozzles with the stream nozzles in the same zone. To obtain an adequate amount of water similar to the spray nozzles zones, the watering time may have to be increased on the stream nozzle section.   

To see the entire series of lawn sprinkler articles go to Lawn Sprinkler tab on the HomeownerBOB web page.   

Good Luck   


Seasonal Reminder – Summer Household To Do List

July 5, 2009

100_0497Summer is Here!!!  Its been close to 100 degrees most of the week, and it could be that hot till Labor Day. This seasonal reminder is more about making sure everything continues to work well through the stress and strain of the summer months more than anything. If you live near me, getting these things done before 10 AM in the morning is the best time of the day, otherwise you may wait till after 6 PM or so.  If you need details on what to look for or what to do, click on the link (if there is one) and it will take you to the post that was written on the subject and provide more detail.

  1. Heating/Cooling-Air Filters: If you live in a dusty area and/or have been using your air conditioner a lot, inspect you filter and change it if it has noticeable build up from your spring change out. 
  2. HVAC Outdoor Unit: We did this in the spring and it’s good to do it again as vegetation has been growing through the spring months. Get your garden trimmers out and trim away any vines or growth away from the  outside condenser. You should have 18″ to 2 100_0233feet of clearance around the unit. Airborne particles generated by the blooming of trees and bushes can easily show up around the air conditioning condenser. Take your water hose and wash down the outside coils. Check the condensation drain that comes from the air handler in the house. Ensure that it is clear of obstacles or debris by pouring water through it.
  3. Water Leaks: Check all water fixtures and toilets for leaks. Inspect fixture drains for water puddles or loose joints in the traps.
  4. Lawn Sprinklers: If you read my weekly posts, you may notice I have been writing a lot on lawn sprinklers. This subject has been getting the most hits and questions so I have responded by writing more articles on the subject. Even though we performed this maintenance during the spring, yard work and vegetation growth can cause some additional sprinkler maintenance. Exercise the system. Look for excessive water traveling down the driveway or sidewalks. Inspect the sprinkler heads, look for blow-by, odd spray patterns, missing heads, pooling water and brown spots.  Replace or repair the heads. Chasing Lawn Sprinkler Leaks is the first of the series and covers the inspection, leak detection and repairs in more detail.
  5. 100_0503Exterior Inspection:  Walk round the house, look for bird and wasp nests, as well as locations that rodents might be using to get in the house. Use caulk to re-seal  any breaches in structure that may be an entry point for rodents or bugs.  They are all looking for cool locations and possible water.
  6. Interior Inspection: Flush kitchen and bathroom sinks with scalding hot water for approximately 3-5 minutes to clear out any build up.
  7. Appliances: Use a hand held vacuum cleaner to clear the dust bunnies from the vent at the bottom the unit. Pull you refrigerator out from the wall and do the same. If it’s within your skill set, turn off the unit, pull the back cover off,  and vacuum out the condenser coils and all the dirt around the fan.
  8. Surface Water Drainage: Culverts, waterways and landscape drainage systems should be cleared of debris and overgrowth that has occurred.100_0206
  9. Electrical Service: Inspect the Entrance, Mast and Weather-head. With tree limbs heavy with leaves, seed pods, fruits and nuts, you may have some limbs that are drooping on your electrical service lines. 
  10. Electrical Service-Smoke Detectors: Clean your smoke detectors of cob webs and change the battery.
  11. Test your security system: Work with monitoring service to validate all the door, window, glass break, and motion sensors operate properly. 

If you are needing some additional information on one of the topics that I have not written about, let me know and I will put it higher on the list of articles to write. Email to HomeownerBOB@gmail.com


Whole House Solar Landscape Lighting

July 2, 2009

A8Z13B9CA3D5A27CAS4GVOZCAKPXCYCCA5LKGM1CAAHFRGBCANED30CCA6TWYHGCAJBM3P4CACLJ7NMCA7F7M39CARUVRZBCAD43ASACAZ2Y7RLCAFKBJQ6CAQIZF9QCA7PZJM4CA0JRJ0ZCAE87VPSI like the concept of solar lighting but don’t like the choices. Mass marketed solar landscape lighting is pretty wimpy and in its current form will have difficulty competing with traditional low voltage landscape lighting.  Being the Techno-nerd I am, this seemed like a great opportunity to create a centrally powered solar landscape lighting system. By appearance, it looks a lot like a low voltage light system you would buy from a home center, but with notable differences:

Removed: AC Transformer, Incandescent Light Bulbs

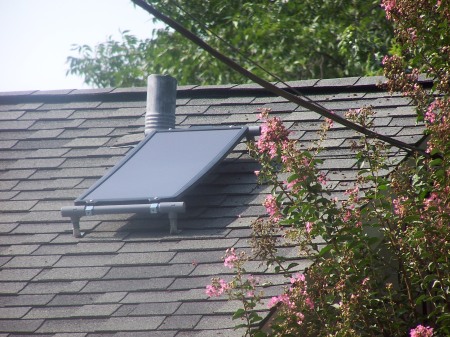
Added: 15 Watt solar panel as a power source, 35AH 12 volt solar battery for power storage, and 6- 21 pin LED light bulbs with a MR-16  base (MR-16 base is used in most landscape light fixtures)

The most important addition was the use of LED light bulbs in lieu of traditional incandescent bulbs. Granted, the LED bulbs are not cheap but may last over 25 years running them 4 hours a night. When I started this project I paid close to $20 a bulb. Today, that same bulb sells for about $8-$10.  The light bulbs alone change the power usage from 500 Watts per hour to less than 15 Watts.

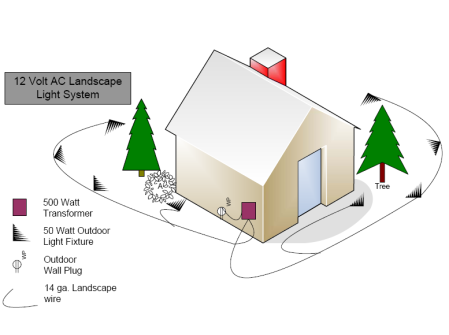
Standard 12 Volt AC Landscape Lighting Systems: This drawing is a general depiction of a landscape lighting system including 8 light fixtures with a 500 Watt transformer. In this scenario, using the 80% rule you have 420 Watts of usable power. If you used 50 Watt bulbs you have a budget of a little over 8 fixtures. 

12VAC

Solar Powered 12 Volt DC Landscape Lighting System: For me, it’s cost prohibitive to build a 500 Watt solar lighting system. By converting the bulbs to LED and reducing the fixture count to 6, I created a similar system using solar power. Granted, the brightness will be good but not near as bright as the 50 Watt incandescent bulbs, but 6 to 10 times greater than the current breed of solar light fixtures on the market today.  If you look at the second drawing, I have removed the transformer, reduced the fixture count to 6, removed the connection to the utility AC and added the solar equipment and battery.

  12VDC

The Design:  The drawing of  the 12 VDC system is very similar to the 12 VAC system. Since I built the system from scratch, I allowed for growth considerations by enlarging the wire and battery sizes. If you are considering converting an existing system, validating your voltage drop numbers may alleviate future problems. Changing the bulb size or the number of bulbs can also alter the calculation, so adjust the calculation and components as necessary.  Here is the design criteria:

  • System controller has a non-adjustable LVD (low voltage disconnect) at 11.7 VDC (per Morningstar)
  • System controller will re-connect at 12.8 VDC (per Morningstar)
  • The CSB 12340 battery can provide 5.88 Amps constant current to down to 11.7 VDC (per their documentation) for 4 hours
  • Each circuit will not exceed 1 Amp of drain (= I in calculation) 
  • Use a voltage drop of .30 looped voltage drop (=V in calculation). Using a .30 will allow the bulbs to operate to 11.4 VDC before the circuit disconnects at the LVD of 11.7
  • The circuits will use 14 ga. (4070 CM) copper wire for each circuit 
  • Using the voltage drop calculator to calculate cable length, each circuit needs to be less than 55 feet in total length. If you need longer cable runs, you can increase the cable size from 14 to 12 or 10 gauge.

You can also use this on-line calculator from Southwire. The calculation is similar but is geared toward an AC circuit. But you can play around with the numbers easier with the calculator.  Because they use % voltage drop in lieu of true voltage drop, use 2.5% to achieve a .30 drop. 

Voltage drop Calculation     (CM/11.1)/I*V=L 

  • CM= Circular Mil area of the cable
  • 11.1= Conductivity factor for copper cable
  • I= Peak Current
  • L= One way cable length
  • V=Allowable voltage drop

 Product Solutions based on Design:

  • Battery: Using the CSB 12340 , I have a total Ampacity budget of 5.88 Amps for 4 hours of run time. NOTE: In an attempt to find a battery locally, the closest match was the CSB 12340 battery.  Since it exceeded my requirements,  would support future growth … I took it.  With the 12340 I have enough battery capacity to support a larger demand based on my 4 hour requirement
  • Solar Panel: This panel can produce 15 Watts or 1 Amp of 12 VDC electricity. Based on the battery, I can enlarge my system by 5 more panels, but with only one  panel installed, this element remains as the limiting factor in the system
  • Wire: One 14 ga cable will allow up to 1 Amp of current for a total of 55 feet. TIP: To create greater flexibility, I ran multiple runs of 14 ga. cable to different parts of my landscape, in lieu of one  (or two) long cable(s). This way, I spread the lighting budget over more than one conductor with separate circuits. Again, this allows me flexibility for growth 
  • Bulbs:  Using the Voltage drop calculator; at .16A per (21pin) LED, I can support 6 lamps over a 55 foot circuit. The LED bulb was a direct replacement for the 20 Watt bulb supplied by Malibu

Parts List:

  1. 200 feet of #14 ga copper landscape wire. Even though the wire looks very similar to lamp cord, the rubberized sheath is designed for outdoor and underground usage. It’s important to use the wire specifically designed for this purpose. I bought this from the Orange Box Store but you can buy this in bulk over the Internet a bit cheaper. As mentioned I created multiple circuits to build the system
  2. 15 Watt Solar Panel. Purchased from Northern Tool Company. The one I chose will allows  up to seven additional panels. Based on my current design, I am at the limit of one 15 Watt panel, so I will be adding at least one more panel to increase my fixture count
  3. 6 Malibu Landscape light fixture. I used the basic $15 fixture from Malibu Lights. Most normal light fixtures are rated by wattage and since I am using LED bulbs the Wattage ratings are insignificant to the project.
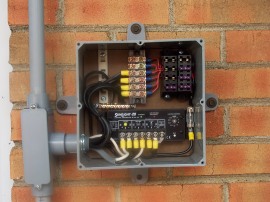
  4. Battery Charge Controller & Light Timer.The Sunlight solar light controller from Morningstar is a perfect controller for the application, it includes a charge controller, adjustable timer, low100_0500 voltage disconnect, and it uses the solar panel to determine when to start the lighting cycle. See the MorningStar Sunlight Controller webpage
  5. LED Light Bulbs. LED’s light bulbs are on the cutting edge of new lighting designs. For that reason they are still expensive with limited standards defining their make up and performance. The first round of bulbs cost over $20 each and lasted about 6 weeks. The second set I bought for $10 each have been working for over 6 months. However, the light output has varied with each shipment from a yellow tint to blue even though they are all supposed to be cool white. To date, LED bulbs increase their light output by increasing the number of individual LEDs in the bulb, I chose a 21 pin bulb with a wattage demand of 2 Watts per bulb (new styles are starting to show up on the market using fewer LED’s requiring more power and greater output)

 Innovation Comes With a Price:

 Solar WorksheetHere is a basic breakdown on the cost of the system. Both the copper wire and LED light bulbs were reduced to their current cost. I included a cost analysis on the electricity used for a standard AC derived system based on a 1000 Watt system. So, with a 500 Watt system the savings would be about $86.40 per year with a payback at almost 7 years. I believe the system could be cost-reduced a bit more over time, but it will still not compete in price with an off the shelf system AC powered system. 

The Cost of Operating a 1000 Watt Landscape lighting System:

  1. 1000 Watt used per hour of run time
  2. 4 hours of run time per night, 7 days a week
  3. 12 cents  a Kilowatt,  per hour charged by local electric utility
  4. 1000 Watts = 1 kW
  5. 1000w  x4 hours = 4000 W. 4000W x 30 days =120,000 watts per month
  6. 120,000w /1kWH= 120kWH per month
  7. 120 kWH x .12 cents = $14.4 
  8. $14.40 per month to run landscape lighting or $172.80 per year

 The Completed Solution and Conclusion:  Solar Panel2I started this project about 2 years ago and just worked on it when time and money permitted. For the most part it was fun to put the project together. Overall, I am happy with the results. I used the lamps with a bluish tint (cool white) and it gives the house an interesting look over the warm light found with incandescent bulbs.   Based on the 100_1901calculations, I will be adding another panel soon. By adding the second panel I can add up to 6 more light fixtures.

In comparison, the centralized solar system is superior to the stand alone solar fixtures hands down. It allows the use of all the different fixtures available on the market today as you are not restricted to fixtures with a solar panel attached to the top. Additionally, the battery life expectancy is a bit better than the small AA batteries found with the stand alone units. And even though the centrally powered solar system does not equal the AC powered version 1 for 1, it’s a lot closer in comparison. SolarControl Pnl1

If you are thinking of building your own system and have questions,  drop me a note  at  HomeownerBOB@gmail.com

Make sure and take a look at my update on this project. The prices of solar panels have continued to fall allowing me to increase the size of the system.